![]()
Custom Bike Parts
How to Change the Oil in a 2002 Harley Davidson Twin Cam 88 Cubic Inch Engine.
I headed out to the garage to get my bikes ready for my trip to the Sturgis Motorcycle Rally. I had a list of things to
do to get my 2002 Harley Davidson FXDL Low Rider ready for my wife to ride 725 miles one way to Strugis South Dakota.
First on the list is change the oil and filter. I have done this
many times, so I thought I would share some pictures and information
about this process. It's simple enough with a bit of time and a
few tools you too can save a lot of money doing routine motorcycle
maintenance on your own motorcycle in your garage.
The first thing to do is get your work area ready, clear the area and get out a few
tools. The process of changing the oil can be a messy
adventure. So I get a piece of cardboard and place it on the
floor where I am going to change the oil. This make easy work of
cleaning up the floor if you happen to spill or drip a bit of oil. One of the tools you will need is a pan to catch the oil
in. I have two I use, a big round shallow steel pan, and one I bought
just for changing oil in all of my cars. The yellow one has a
funnel on it which is helpful, but it is too tall to slide under my
bikes. Other tools you will need are screwdrivers, a few wrenches, oil filter wrench,
and some disposable rags, and gloves. Some mechanics use rubber
surgical gloves, I generally just wear a pair of leather gloves, or let my hands get dirty.
Now check on your new supplies, a new oil filter, and 3 quarts of
oil. The Twin Cam 88 Cubic inch engine uses a newer filter than the older Evolution Engines so make sure you get the correct one and don't interchange them. I use Harley Davidson brand oil. I won't get into the
debate about other brands being just as good, or Synthetic vs. Regular
oil, or any of the other topics that can be debated about oil. I
figure it is only 3 quarts of oil and even if I pay a premium for
Harley Davidson brand oil, it's only about 5 dollars more. At
Sturgis one year I talked to an employee of Harley Davidson, and he
explained a few of the benefits of using the oil that they have
specially formulated for the Evolution Engines. This may be true it may be bunk, who knows. Harley only warrenties the bikes if Harley Oil is used so I might as well sick with it. Because the motors
are air cooled, and can run really hot, I don't want to take a
chance. In the past I have used other brands of oil, and I
noticed that I was burning a bit of oil before I got to the oil change
interval so I switched back to Harley brand. My 2002 Low Rider has 19,990 miles on it now and is still running strong, so I feel confident
that it will continue to run strong.
The oil change intervals are listed in the owners manual, and a the
Factory Service Manual. I would definitely recommend purchasing a
service manual, once you get confident with changing your engine oil
you can move on to changing the other fluids and really save a lot of
money.
Ok now you should be about ready to actually start the oil
change. One tip that makes the oil change a bit more complicated
is to make sure you motorcycle engine is hot. The means
change the oil right after you have warmed it up and been for a ride
and the bike is at normal operating temperature. The reason for this
is to get all of the dirt, sludge, carbon, water, and other bad stuff in
the oil moving and ready to be drained. Hot oil will also flow
out of the bike faster. But be very careful not to burn yourself
on the engine or mufflers. I wear my welding gloves when I am working around the hot exhaust pipes on my bikes.
Step one: Drain the oil.
In this first picture you can see the drain for the oil on my Twin Cam Engine it is a bolt in the bottom of the engine and transmission houseing. The Twin Cam has a big piece that contains both the drain plugs for the Engine Oil and the transmission oil. Be careful to get the correct drain plug or you will be changing both the Transmission oil and the engine oil. I have done this before without knowing. Looking at the picture int he service manul and or the owners manual can also be a bit confusing. The picture is of the bike from the bottom. So it is like you turn the bike completely upside down and the you can oreint the picture to the correct drain plug.
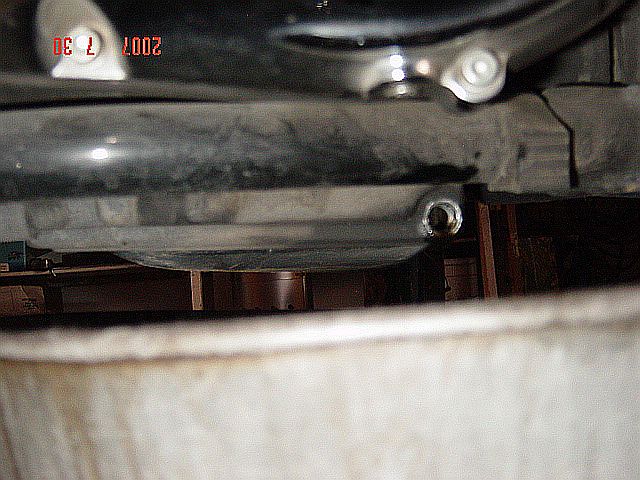
This picture show the drain plug as it sits on the rear side on my Engine case. The bolt you need to take out is on the driver side of the bike. If the Bike were a car the driverside is the left side or the side of the bikd with the kick stand. The plug is on the side of the housing not on the bottom. The drain for the transmission is on the bottom of the housing on the right side of the case.
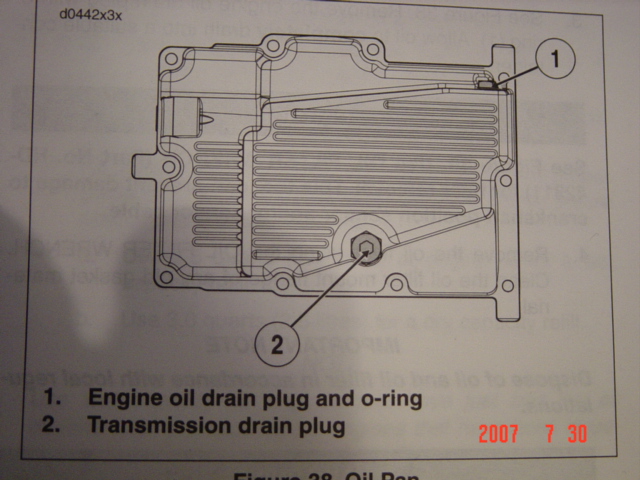
This picture is from my owner manual. It shows the two plugs.
Now make sure you remove the oil filler plug. This will allow air to get into the oil tanks so the oil can flow out the bottom of the engine into the drain pan.
The oil filler cap is on top of the main engine housing. It is accessable from the right side of the bike. The plug has a long oil level checking stich attached to it. Pull it out and clean it off and set is someplace it will not get dirty. Be careful to keep dirt and other junk out of the oil tank while the plug is removed.
Step Two: Remove the oil filter.
The oil filter is on the front lower section of the Engine. It is easy to get to and easy to remove with the correct tools. You will need a small oil filter wrench, or a very large pair of pliers. The best option is to get the proper oil filter wrench and wrap it around the oil filter and slowly and gently turn the wrench counter clock wise to remove. Its is the standard right to tight, lefty loosy threading. In a pinch you can use a big set of pliers to grab the filter and crush it and remove it. (Note the very last option is to punch a screwdriver through the filter and twist it off using the screwdriver and a wrench.) Like I said the best option is to just get the proper tool.
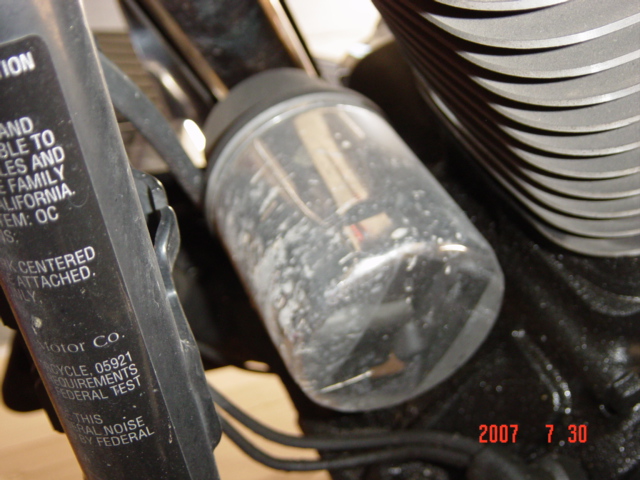
This picture show the chrome filter on the front of my bike. The filter is tucked between the frame and the engine.
Once the Oil filter is removed you will need to clean the threads and the area on the engine that mounts the oil filter. Be very careful to keep this area clean and keep any and all dirt out of the engine. This area of the bike tends to build up oil, sand, rocks, dirt, and grime. Keeping this junk out of the engine is important. Don't spray or hose this area off with the oil filter removed.
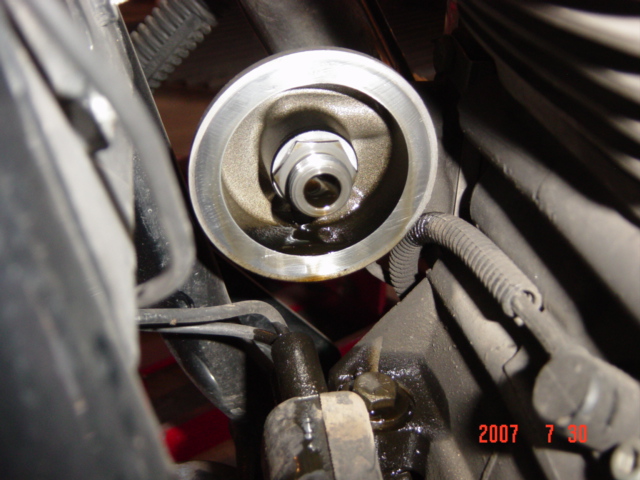
When you take the oil filter off you will see the exposed threads of the mounting bracket. Get a clean cloth and clean the oil off the mounting surface of the bracket and remove and extra oil the is here.
Step Three: Install a new Oil Filter.
Get you new oil filter and before you install is get some clean oil and spread it around on the rubber gasket. You can even put a little bit of oil into the filter. This primes is so when the bike starts is has oil in it versus, needing to pump the oil from the oil tank and the engine running for a few cycle without oil. On my Diesel Truck when changing the filter I completely fill the filter with oil before installing it. Once you have placed oil on the rubber gasket, slowly thread the oil filter on to the threads on the engine. Be careful not to cross thread the filter on the threads. Once the Oil filter snugs up to the engine using only your hands tighten the filter about 1/4th of a turn. This is about as tight as you can screw the filter on using only your hands. Do not get out your oil filter wrench just use your hands.
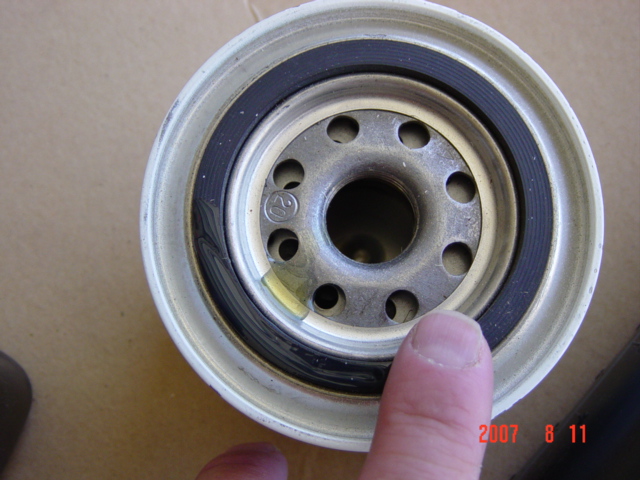
This picture show the bottom of the oil filter. This is an oil filter for a Jeep, but you get the idea and all oil filters are basically the same.
Step Four: Install the drain plug.
Now all of the oil has been drained out you need to put the drain plug back in. To do this you may need to install a new rubber gasket over the drain plug. You will also want to wipe the end of the drain plug off. The drain plug has a magnet in it that collect metal shaving from the motor. If your plug has a lot of metal parts attached to it this may indicate premature wear to the motor. Tight the plug according to the specification is the service manual. The manual will have a torque wrench setting. Using a torque wrench snug up the filter plug. Note that the drain plug bolt is harder than the cast metal used in your engine casing. So if you put too much pressure on the bolt the housing will break causing serious repair needs to the motor. If you don't have a torque wrench just snug up a bolt a tiny bit past the point it stops freely turning in.
Step Five: Add new oil.
Like I said I use Harley Davidson Oil, and I am not a fanatic of synthetic, but you can certainly use any oil you think will protect your engine.
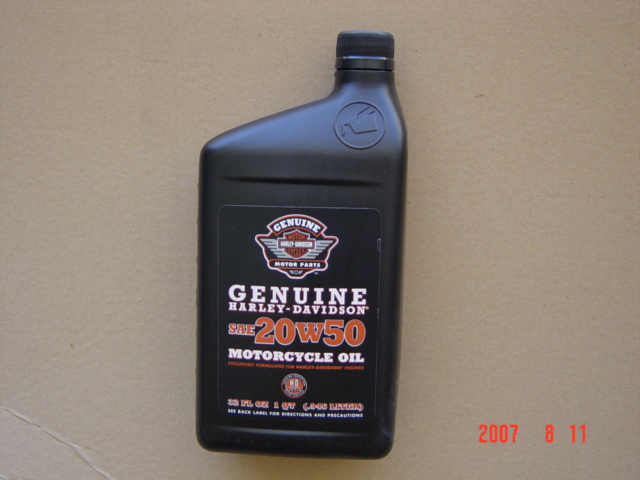
This is the 20W50 oil I use in my bikes. If you live in a really cold environment or a really hot area, you may want to consider a different weight of oil. This 20 weight 50 motor oil works pretty well for me.
The EVO motor when changing the oil and filter takes 3 quarts of oil. It is simple to add the new oil, just remove the cap and pour it into the oil tank.
Easy enough. You are almost done.
Just put the oil can in and let it all drain into the oil tank.
Once the oil has been added to the oil tank you can check the oil level. On the oil filler cap are two notches. If the oil is below the lower notch you are really low.
One other note about starting your bike after and oil change, Make sure you put the oil tank cap on before turning over the engine. If you leave if off the air coming back from the engine will blow oil all over the place, believe me I learned this the hard was once.
When you first turn over the engine do it slowly and let the bike idle, don't start it and rev it up let the engine lubricate all the pieces and parts before you rev it. This only takes a few seconds, but being careful here will certainly not hurt you.
Step Six: Cleanup.
Be sure to recycle your used motor oil. Any and All modern parts stores like Autozone, Checker, or Napa will take your used oil and put it in the recycle bin for free. Don't do anything silly like put it in the garbage or pour it out back.
| Home | Information | ||
|
Disclaimer: The information presented and opinions expressed herein are those of the authors and do not necessarily represent the views of MyChopperBlog.com and/or its partners. |
|
NOTE: My email address is shown here in the picture with my Jeepin Dog. If you have questions please email me. |